
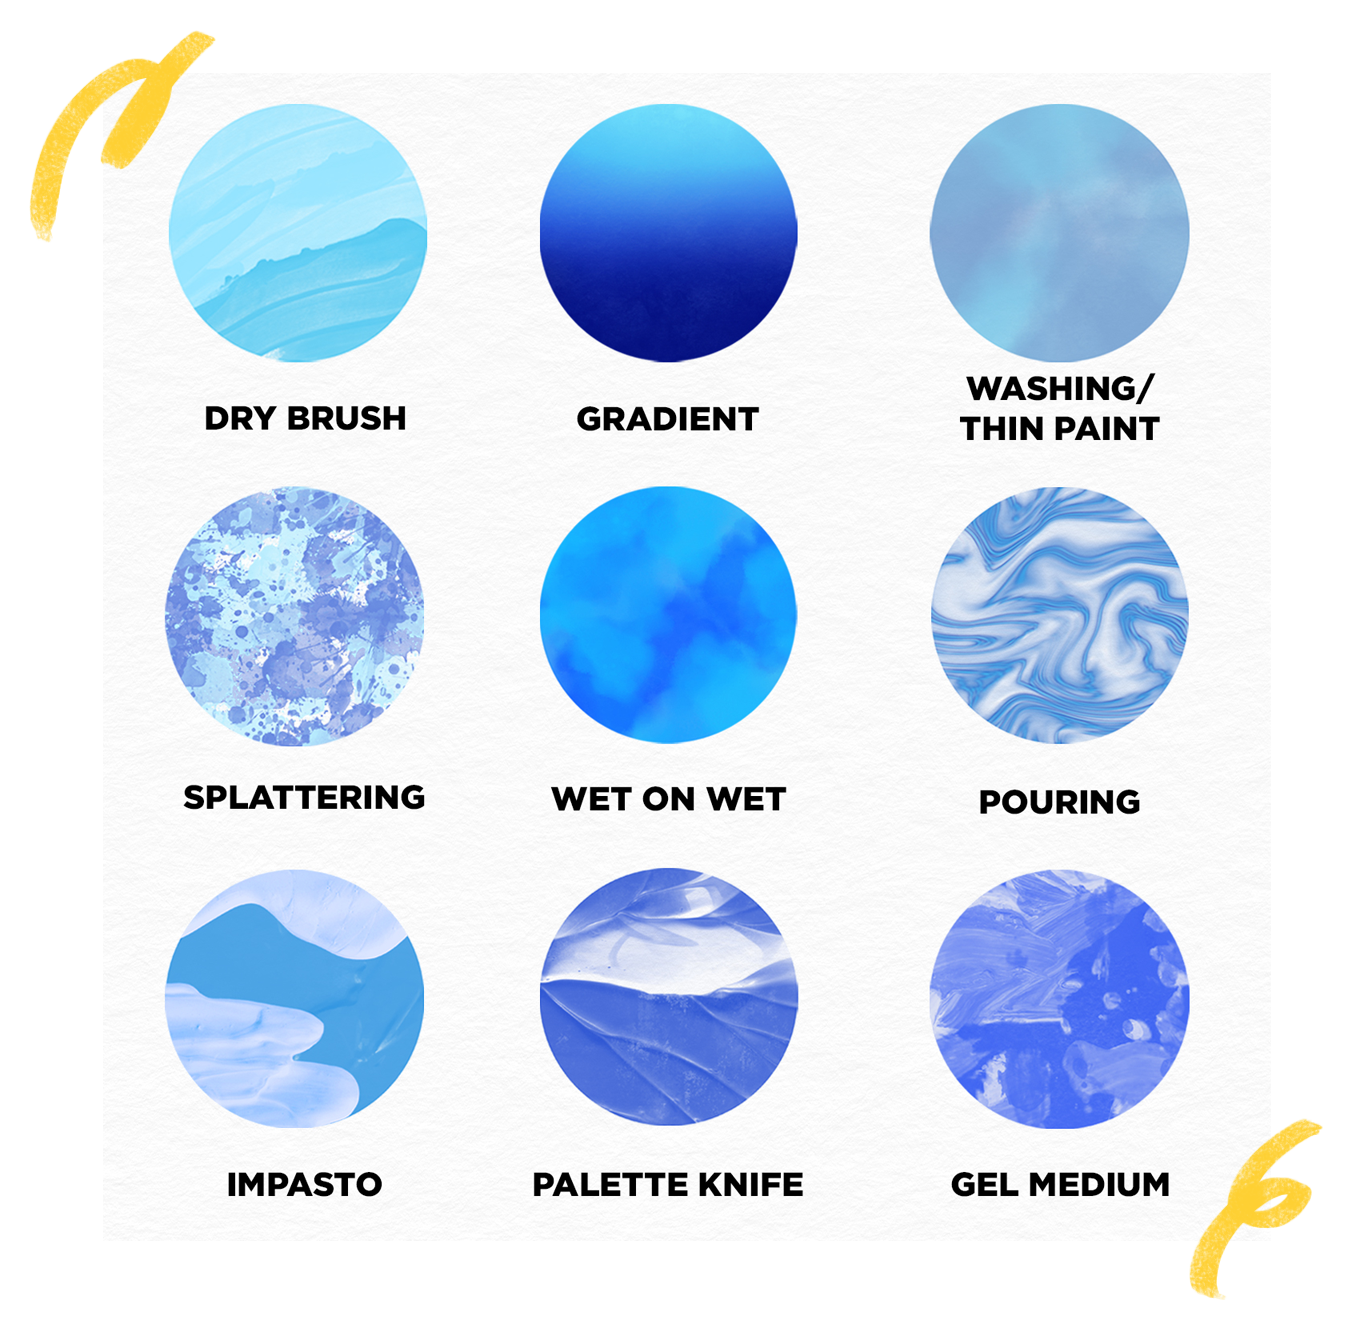
Acrylic Painting Techniques: 15 Methods Every Painter Should Know
Fifteen techniques that cover the full range of what acrylic paint can do — from soft wet-on-wet blends to wild abstract pours, palette-knife impasto, and scumbled atmosphere.
Watch a floral piece built layer by layer with wet-on-wet blending and dry-brush highlights.
Wet-on-wet blending
Wet-on-wet blending is the foundational acrylic technique for soft gradients and atmospheric transitions. Paint two colors side by side while both are still wet, then brush them together in the overlap zone to create smooth, seamless colour shifts.
When to use: skies, skin tones, atmospheric distance, any soft gradient. Step-by-step: (1) load two adjacent colors side-by-side, (2) work in a roughly 30-second window before paint skins, (3) use a soft synthetic filbert to pull one color into the other with gentle back-and-forth strokes. Pro tip: mist the canvas with a fine spray of water to extend open time by 30–60 seconds.
Dry brush
Dry brush is a textured mark-making technique where a brush carrying very little paint is dragged across a surface to leave broken, grainy strokes that catch the canvas weave.
When to use: tree bark, fur, hair, old wood, weathered surfaces, aged lettering. Step-by-step: (1) load a stiff flat or bristle brush with paint, (2) blot 80% of the paint on a paper towel, (3) drag the almost-dry bristles across dry paint or raw canvas. Pro tip: stiffer bristles give rougher texture; synthetic bristle brushes hold up better than sable.
Glazing
Glazing is the technique of applying a transparent, thinned colour wash over dry paint to shift the underlying hue without obscuring it. It's how classical painters built luminous colour over 400 years before acrylic existed.
When to use: warming or cooling an area, adding atmospheric haze, deepening shadows, shifting colour temperature in a focal zone. Step-by-step: (1) mix paint with glazing medium (or water + matte medium) at roughly 1:4, (2) apply in thin transparent layers over bone-dry paint, (3) let each layer dry fully before the next. Pro tip: multiple thin glazes always beat one thick one — 3-4 glazes can shift a colour dramatically without losing the texture beneath.
Impasto with palette knife
Impasto is the technique of applying acrylic paint in thick, sculptural strokes — usually with a palette knife — so the paint stands off the surface and catches real light. It's Van Gogh's signature move.
When to use: bold focal points, expressive skies, flower petals, dramatic textural contrast. Step-by-step: (1) mix paint 1:1 with heavy gel medium to prevent cracking, (2) scoop paint onto a palette knife, (3) apply in single confident strokes rather than reworking, (4) let thick passages cure 48 hours before any overpainting. Pro tip: heavy body acrylic (like Chalkola's 22 ml tubes) works impasto directly from the tube without extra medium.
Sponging
Sponging uses a natural or kitchen sponge loaded with paint and pressed against the surface to create mottled, organic textures impossible to achieve with a brush.
When to use: foliage, cloud texture, crowd scenes, mottled backgrounds, stone surfaces. Step-by-step: (1) dampen a natural or kitchen sponge so it doesn't drink paint, (2) dip in one or two mixed colours, (3) press and lift (don't smear), rotating the sponge between presses so the texture doesn't repeat. Pro tip: natural sea sponges give the most varied, organic texture; kitchen sponges give a more uniform pattern.
Stippling
Stippling is a pointillist technique where paint is applied as countless small dots — with a round brush, stencil brush, or the blunt end of a brush — rather than strokes. From a distance, the dots merge into continuous tone.
When to use: soft texture transitions, skin shading, grass and foliage, whenever you want no visible brush strokes. Step-by-step: (1) load a stiff stencil or round brush, (2) tap the bristles straight down onto the surface to deposit dots, (3) build density gradually — dark spots first, light dots on top. Pro tip: for very fine stipple, use a cotton swab or the blunt handle end of a brush.
Watercolor-style washes
A watercolor-style wash dilutes acrylic with water (1:3 or more) and applies it with a soft, large brush to create transparent, flowing colour areas. The finish mimics watercolor but with full permanence once dry.
When to use: background sky, atmospheric distance, loose study work, layered transparent colour effects. Step-by-step: (1) wet the paper or canvas first, (2) dilute paint 1:3 to 1:5 with water, (3) lay in large soft areas quickly with a mop or wash brush, (4) let dry before adding detail. Pro tip: use acrylic paper or 300-gsm watercolor paper — regular canvas absorbs unevenly at this dilution.
Underpainting
Underpainting is a monochromatic first layer — usually in burnt sienna, raw umber, or a neutral grey — that establishes values before you add colour. It's an old master approach that gives the finished work depth and luminosity.
When to use: serious work where you want complex value structure, portraits, landscape compositions that need atmospheric depth. Step-by-step: (1) mix a thinned earth-tone or grey wash, (2) paint a simplified monochrome version of your composition focusing on lights and darks only, (3) let fully dry, (4) build colour layers on top letting the underpainting warm the shadows. Pro tip: leave small glimpses of the underpainting visible in shadow areas for instant warmth.
Layering (opaque build-up)
Opaque layering builds a painting from back to front with successive opaque layers of paint, each covering what's underneath. Unlike glazing (transparent) or wet-on-wet (blended), layering keeps each layer distinct.
When to use: realistic portraits, detailed landscapes, any composition where foreground objects need to sit clearly on top of backgrounds. Step-by-step: (1) paint background layer fully, (2) let dry 15–20 minutes, (3) paint middle-ground on top, (4) dry, (5) paint foreground detail last. Pro tip: work thin-to-thick — first layer slightly diluted, final layer full opaque — so adhesion is strongest.
Sgraffito (scratching back)
Sgraffito — from the Italian for "scratched" — means painting one colour, letting it partially dry, painting a contrasting colour over it, then scratching back through the top layer to reveal the colour below.
When to use: hair strands, grass blades, grain patterns, decorative line work, graffiti-style effects. Step-by-step: (1) apply base colour and let it become touch-dry, (2) quickly paint contrasting top colour, (3) while top layer is tacky (3–8 minutes), scratch with a pencil, stick, palette knife, or the back of a brush handle. Pro tip: the top layer needs to be tacky, not fully wet or fully dry — timing is the only tricky part.
Acrylic pouring
Acrylic pouring thins fluid acrylics with a pouring medium and flows them onto a canvas laid flat on a surface, then tilts the canvas to create organic patterns and cells. It's the modern abstract fluid-art technique.
When to use: abstract pieces, coasters, mixed-media accents, phone case art, any project where you want unpredictable organic patterns. Step-by-step: (1) mix paint 1:1 with pouring medium to the consistency of warm honey, (2) layer colors in a cup, (3) invert onto canvas laid flat, (4) tilt to flow the paint edge-to-edge. Pro tip: add a single drop of silicone oil per color for dramatic cells; use a crème brûlée torch to pop surface bubbles.
Palette knife painting
Distinct from impasto (which is about thick paint), palette knife painting replaces the brush entirely — every mark is spread, scraped, or edge-dragged with a flat metal blade. The result is sharp-edged, architectural, fresh.
When to use: modern expressive work, knife-edge still lifes, flowers, abstracted landscapes, any composition benefiting from crisp, straight edges. Step-by-step: (1) scoop paint from palette, (2) spread, scrape, or edge-drag across canvas, (3) avoid reworking — single confident motions read best. Pro tip: dip the blade edge in a second contrasting colour for bi-colour ridges.
Scumbling
Scumbling is like dry brush's opaque cousin: a light, broken layer of opaque paint dragged loosely over a darker dried layer so parts of the darker colour show through. Creates soft, mysterious atmosphere.
When to use: distant mountains, fog, old plaster walls, any surface that should look slightly worn or hazy. Step-by-step: (1) let the under-layer dry fully, (2) load brush lightly with an opaque light colour, (3) drag loosely across the surface so some of the under-layer shows through. Pro tip: unlike dry brush (rough texture), scumbling should look soft and atmospheric — use a softer brush with less pressure.
Color blocking
Color blocking treats the composition as distinct zones of flat, saturated colour — no gradients, no shading, no atmospheric effects. Think Matisse cutouts, Pop Art, or vector-style illustration.
When to use: Pop Art pieces, graphic illustrations, modern abstract compositions, wall murals. Step-by-step: (1) plan the composition as flat zones, (2) mask with painter's tape if you want crisp edges, (3) fill each zone with one opaque colour, two coats if needed, (4) remove tape before the paint fully cures to prevent pulling. Pro tip: seal tape edges with matte medium before painting to prevent bleed.
Splatter
Splatter is the technique of flicking, tapping, or spraying droplets of thinned paint onto a surface for energy and randomness. From Jackson Pollock's drip paintings to subtle accent dots, splatter brings life to otherwise controlled work.
When to use: starry skies, texture accents, abstract energy, nature scenes (pollen, rain, snow), any composition that feels too static. Step-by-step: (1) thin paint to milk consistency with water, (2) load a stiff-bristle brush, (3) tap the brush handle against your finger, a stick, or a second brush handle to flick droplets at the canvas. Pro tip: mask off areas you don't want splattered with paper — splatter spreads 6 inches or more.
Frequently asked questions
What are the techniques used in acrylic painting?
Fifteen core techniques cover almost every use of acrylic paint: wet-on-wet blending, dry brush, glazing, impasto, sponging, stippling, watercolor-style washes, underpainting, opaque layering, sgraffito, acrylic pouring, palette knife, scumbling, color blocking, and splatter. Each suits different subjects and moods.
What are the rules of acrylic painting?
Five working rules: (1) paint thin to thick across layers, (2) dark to light — easier to paint light over dark than reverse, (3) large to small — block in big shapes before detail, (4) let each layer dry 15–20 minutes before overpainting, (5) plan your values in monochrome before adding colour. Most classical painting conventions apply.
Which acrylic painting technique should a beginner learn first?
Wet-on-wet blending. It teaches brush control, colour mixing, and timing — three skills that transfer to every other technique. Once soft gradients feel natural, branch into dry brush (for texture) and glazing (for colour shifts). That trio covers most classical acrylic work.
What does adding baking soda to acrylic paint do?
Baking soda thickens acrylic paint and adds a gritty, sandpaper-like texture that's great for mimicking stone, concrete, or aged stucco surfaces. Mix roughly 1 part baking soda to 3 parts paint. The paint becomes slightly less flexible, so best used on rigid panels rather than stretched canvas.
What does adding dish soap to acrylic paint do?
A single drop of dish soap reduces surface tension and helps thinned acrylic paint flow more evenly — it's a common substitute for flow improver in acrylic pouring. Use sparingly (one drop per cup of paint); too much weakens the acrylic binder and can cause peeling once dry.
Can I combine techniques in one painting?
Absolutely — most good acrylic paintings do. A common combination: underpainting to set values, wet-on-wet for soft backgrounds, opaque layering for middle ground, dry brush for texture, and impasto for focal highlights. Layering the techniques from atmospheric to crisp gives paintings depth.
How do I keep acrylics workable longer for blending?
Three options: (1) spray the canvas with a fine mist of water every few minutes, (2) mix paint with a glazing or slow-dry medium like a dedicated slow-dry medium, (3) use 'open acrylics' formulated to stay wet longer. The slow-dry medium is the easiest of the three to learn.
Do all these techniques need special brushes?
No — a basic 5-brush beginner set (2 flat, 1 round, 1 filbert, 1 fan) handles all fifteen techniques. Pouring and splatter need no brush at all. Palette knife work needs one cheap palette knife. Budget around $15 for brushes and you're covered.
Tools for your next project
Chalkola favorites — ready to ship.


