
Watercolor Techniques for Beginners: 7 Essential Methods
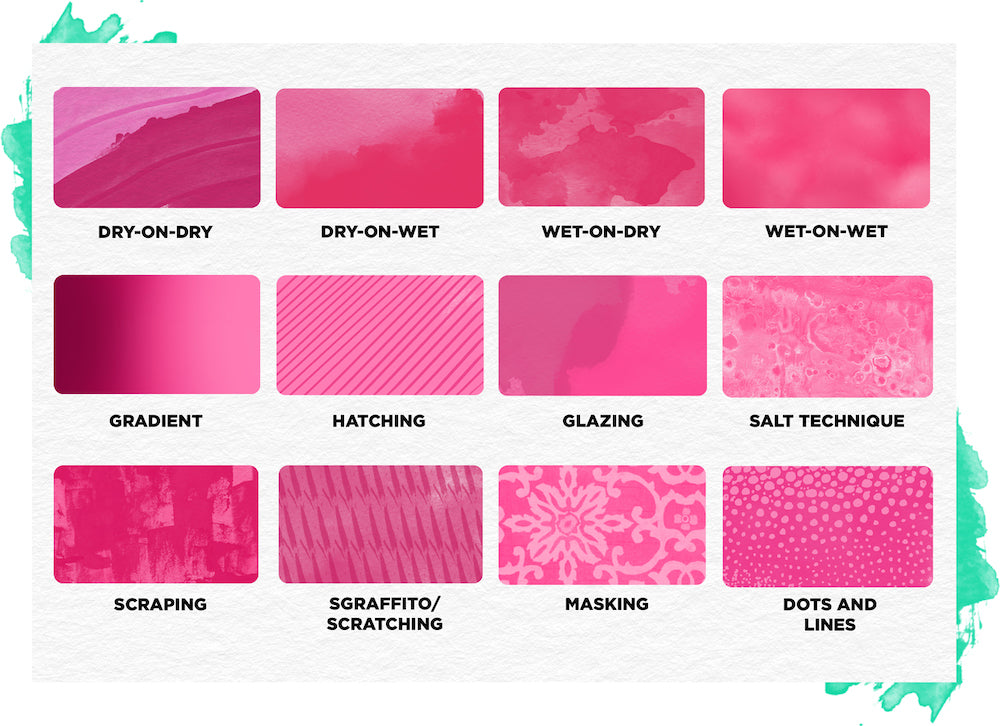
The seven foundational watercolor techniques — each a core skill that unlocks a different kind of subject or mood.
What are the 7 watercolor techniques?
The seven foundational watercolor techniques every beginner should practice are wet-on-wet, wet-on-dry, graded wash, layering (glazing), lifting, dry brush, and salt textures. Each one teaches a different kind of water control and unlocks a different kind of subject or mood. Practice each in isolation before combining them in a finished piece.
Wet-on-wet
What it is: Wet your paper with clean water first. While it's still damp, drop in paint — it bleeds, blooms, and creates soft edges. Pure watercolor magic.
- Wet the target area with clean water using a large brush.
- Wait 10–20 seconds until the shine just fades (paper is damp, not shiny-wet).
- Load your brush with pigment and touch it lightly to the damp area.
- Let the paint bloom outward on its own — don't brush.
Best for: skies, water, soft backgrounds. Gotcha: timing. If the paper is too wet, colors float too freely; too dry, and you get hard edges. Practice on scrap.
Wet-on-dry
What it is: Paint onto dry paper. Gives crisp, controlled edges and accurate shapes.
- Start with completely dry watercolor paper.
- Load your brush with diluted pigment.
- Apply with confident, committed strokes — wet-on-dry doesn't blend, it layers.
- Let each stroke dry before adding another next to it to avoid unwanted blooms.
Best for: detail, architecture, defined shapes like leaves and buildings. Gotcha: less forgiving — commit to placement before brushing.
Graded wash
What it is: Start heavy color at the top, add water progressively as you work down. Result: a smooth gradient from saturated to pale. The foundation of realistic skies.
- Tilt your board slightly so gravity pulls wet paint downward.
- Start at the top with a saturated loaded brush, paint a horizontal band.
- Add a little water to your brush, paint the next band slightly overlapping the first.
- Keep adding water to each successive band until the color runs out.
Best for: sky gradients, water, horizon transitions. Gotcha: work fast; pause and you get hard edges mid-gradient.
Layering (glazing)
What it is: Paint a transparent color, let it dry fully (10+ minutes), then paint another color on top. The layers blend optically — you see both colors at once.
- Apply your first wash. Let it dry completely (touch to check — no dampness).
- Apply second wash with a lighter touch to avoid lifting the first.
- Repeat for deeper or more complex color.
- Each additional layer = richer, deeper color and more visual depth.
Best for: deepening shadows, adding warmth, building complexity. Gotcha: each layer must be fully dry, or the next layer lifts the first.
Lifting
What it is: Re-wet a dried painted area with clean water, then blot with a paper towel to lift pigment off the paper. Creates highlights, clouds, or corrects mistakes.
- Let the wash dry completely.
- Wet a clean brush and scrub the area you want to lighten.
- Blot immediately with a paper towel or tissue.
- Repeat for a cleaner, whiter area — but know that staining pigments may not fully lift.
Best for: cloud edges, highlights on water, fixing errors. Gotcha: some pigments (staining colors like phthalo blue, alizarin crimson) resist lifting. Test first.
Dry brush
What it is: Load a small brush with paint, blot most of it, then drag the bristles across dry paper. Leaves broken, textured marks that catch the paper's tooth.
- Load your brush with pigment, then blot hard on a paper towel.
- Spread the bristles slightly with your fingers.
- Drag the brush across dry rough or cold-pressed paper with light pressure.
- Broken textured marks form as pigment catches the paper's surface.
Best for: grass, tree bark, fur, texture work. Gotcha: don't use too much water — the whole point is broken, dry coverage.
Salt textures
What it is: Sprinkle kitchen salt on a wet painted area. Each grain pulls pigment toward it as it dissolves, creating bloom-like textures.
- Paint a wet wash of color.
- While the wash is still wet (but not pooling), sprinkle salt from above.
- Let the paper dry completely — don't touch the salt.
- Brush off the dried salt to reveal starburst or snowflake-like textures underneath.
Best for: snow, sand, galaxies, textured abstract backgrounds. Gotcha: salt works best on moderately-wet paint — too dry, no effect; too wet, the salt dissolves and smears.
Frequently asked questions
What are the 5 watercolor techniques?
Most beginner guides focus on five core techniques: wet-on-wet, wet-on-dry, graded wash, layering (glazing), and lifting. Our guide adds two more (dry brush and salt textures) for a complete beginner toolkit that covers most subjects and moods.
What are the 12 watercolor techniques?
Advanced guides expand to 12 by adding flat wash, variegated wash, splatter, sponging, scraping (sgraffito), and masking. Master the 7 in our guide first; the extras are variations of the same underlying water control skills.
What are the four watercolor techniques?
The most minimal set is four: wet-on-wet, wet-on-dry, graded wash, and layering. These teach all the fundamentals of water control. Lifting, dry brush, and salt are useful extensions but not strictly required at the beginner level.
How to use watercolor paint for beginners?
Start with wet-on-wet: wet paper, drop in pigment, let it bloom. This teaches water-to-paint ratios and timing — the core skills. Once you can control a wet-on-wet wash, wet-on-dry, graded washes, and layering come much faster. Practice daily on scrap paper before attempting a finished piece.
Which watercolor technique should I learn first?
Wet-on-wet. It teaches you water-to-paint ratios, timing, and how pigment moves — the core skills that make watercolor feel like watercolor. Once you can control a wet-on-wet wash, every other technique comes faster. Spend your first week on this one alone.
How do I stop my watercolors from looking muddy?
Muddy colors come from (1) too many pigments mixed together, (2) reworking wet paint too much, (3) dirty brush water. Fix: use 2–3 colors max per mix, let layers dry fully before glazing, and change water often. Two water jars (rinse + clean) are mandatory.
Why do my watercolor edges look hard and blotchy?
If paint dries mid-wash, you get hard lines. Solution: work faster, dampen your paper first with clean water, or mist with a spray bottle. For intentionally soft edges, always use wet-on-wet. For intentionally crisp edges, always use wet-on-dry — hard lines are a feature of wet-on-dry painting, not a bug.
Tools for your next project
Chalkola favorites — ready to ship.


