New snacks on sale now for a limited time! Use code NEW for 15% off.
Chalkola · Tutorial
How to Paint Your Computer Keyboard Using Acrylics
Updated Jul 2026
QUICK ANSWER
Keyboard painting with water-based acrylic paint markers is the safest way to customize keycaps without ruining the keyboard's electronics. Remove keycaps with a puller, clean with isopropyl alcohol, prime, paint with 1mm fine-tip markers in 2 thin coats, seal with clear acrylic, and reassemble after 24-hour cure. Skip spray paint — it pools under switches.
BEST FOR KEYCAPS — START HERE
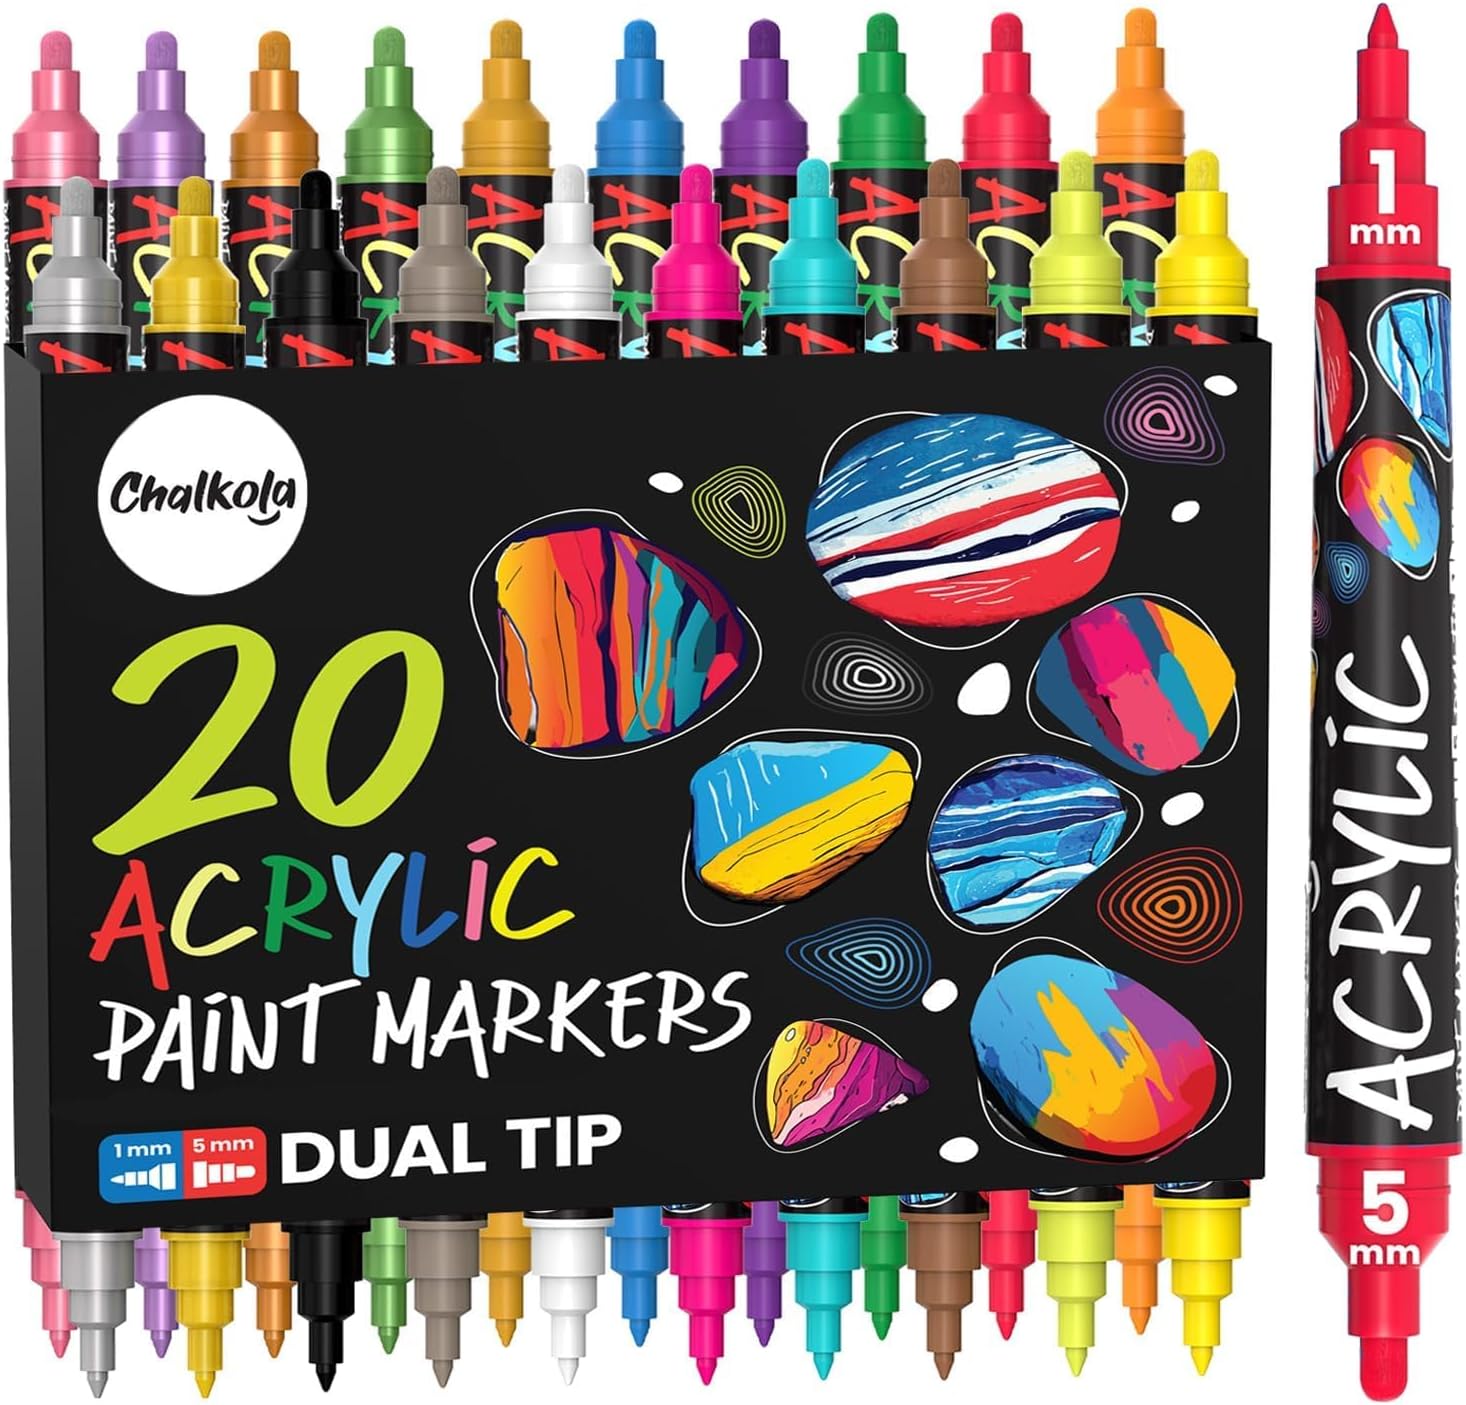
Chalkola 20 Dual Tip Acrylic Paint Markers
★★★★★4.5 · 1,481 verified reviews
$18.95 USD · free shipping
Dual Tip Acrylic Paint Pens Fine Tip Set — Professional grade, highly pigmented, quick to dry & used as paint markers for canvas, paint pens for wood, glass paint markers, rock painting pens, wine glasses & ceramic paint pens (dishwasher safe)
Multiple Use Paint Pen — Get creative with DIY painting & crafts using these acrylic paint pens for canvas painting, fabric paint markers for clothes, porcelain, plastic, stones, polymer clay, as paint markers for wood, paint markers for metal
Water Based Fine Point Paint pens — Smooth colors blend beautifully for vibrant, consistent shades. Resistant to water, fading, and abrasion. Perfect for wood paint pens & rock painting.
Dual tip — 1mm Fine Tip & 5mm Medium tip Paint Pens - Fine point for precise details and lettering, Medium Bold tip for filling large areas. Perfect for all skill levels.
Between our personal life and work life, we spend long hours in front of our computers almost everyday. So much so that we need our work space to be fun, colorful, and inspiring to keep our creative juices flowing. One simple trick to perk up your space is to redesign your computer keyboard by painting on it. Yes, you can definitely do this on your own using acrylic paint or acrylic paint markers, or both.
Acrylic paint is a highly versatile and pigmented medium with a smooth and thick consistency, making it perfect for creating on different surfaces because it quickly dries to a vibrant finish and is very easy to use.
So dust off your old computer keyboard, prepare your art supplies, and let’s hit ENTER on this DIY art-venture!
Prepare your materials and your preferred keyboard design.
If you want to paint the whole surface of your keyboard, it’s best to use acrylic paint so you can cover the whole area easily using a paint brush.
If you prefer to only use acrylic paint markers, a fun idea would be to doodle or design each keyboard key. Chalkola’s 3mm Acrylic Paint Markers feature a reversible nib which has a chisel tip and a round tip for creating different lines, making them ideal for small surfaces like keyboard keys.
You can also use both art supplies like we did. We used acrylic paint to color a larger part of the keyboard surface, and used acrylic paint pens to add the finer details.
To make sure your painted artwork remains vibrant and fresh, just apply a coat of clear varnish to seal the colors.
Aside from your old computer keyboard, you can use acrylics in so many other ways – for creating wearable art, painting on rocks and wood, personalizing homeware, and so much more. You can turn any surface into a masterpiece with this all-around art medium! For starters, you can add more colors to your indoor or outdoor garden by learning How to Paint Plant Pots Using Acrylic Paint Pens. Happy creating!
Acrylic paint vs spray paint for keyboards: which is better?
Most online keyboard-painting tutorials reach for spray paint. We don't. Here's why acrylic paint markers beat spray for daily-driver keyboards:
No overspray on switches: spray paint pools under keycaps and gunks up the mechanical switches. Markers stay on the keycap.
Per-key precision: markers paint one key at a time — perfect for letters, ombre, multi-colour. Spray paints uniform colour only.
No fume / no respirator needed: water-based acrylic markers have low odour. Spray paint requires a mask + ventilation.
Touch-up is trivial: chip a key 6 months later, dot the spot with the same marker. Spray paint touch-ups always show.
No primer for most keycaps: water-based acrylic markers self-prime on PBT and ABS plastic. Spray paint usually needs primer + 24h cure.
For one-colour aesthetic builds (sage minimalist, matte black), spray paint is faster. For ANY multi-colour, illustrative, or per-key design, acrylic markers win.
Step-by-step: how to paint a keyboard with acrylic markers
The whole project takes 4-6 hours of active work + 24-hour cure. Don't rush the cure — that's what kills paint jobs.
Photograph your keyboard layout — you'll need this for reassembly.
Pull all keycaps with a wire keycap puller (avoid plastic ones — they snap on tight caps).
Wash keycaps in warm soapy water for 5 minutes, dry completely (24 hours air-dry or 30 min in front of a fan).
Wipe with isopropyl alcohol just before painting — removes oils and fingerprints that block paint adhesion.
Sketch your design lightly in pencil on each keycap face if doing multi-element art. Graphite disappears under acrylic.
Apply 2 thin coats of acrylic paint marker, 30 minutes between coats. One thick coat cracks under typing pressure.
Add details + accents with a 0.5mm fine tip — gold geometrics, white highlights, edge detail.
Seal with 2 coats of clear acrylic spray (Krylon Clear, satin or matte finish) — vital for typing-wear durability.
Cure 24 hours before reassembling.
Reassemble using your reference photo. Clip keycaps straight down — no twisting.
12 design ideas
12 keyboard painting ideas to inspire your build
Six are 30-minute single-effect paint jobs (gradients, marble, monochrome). Six are 90-minute commitment projects (full illustrations, mandalas, multi-element).
Idea 01 / 12
Pastel rainbow gradient
Each row a different soft pastel — pink → peach → yellow → mint → lavender. Use 1mm acrylic paint markers, blend the seams with a damp brush.
Idea 02 / 12
Galaxy nebula keys
Treat the whole keyboard as one canvas — paint a continuous galaxy scene from key to key. Reassemble carefully to align the design.
Idea 03 / 12
Retro neon synth
Hot pink, electric purple, cyan stripes — each key gets one bold colour. Add chrome accent lines with a metallic silver acrylic marker for the synthwave finish.
Idea 04 / 12
Sage minimalist
One colour, no embellishment, calming. Sage, dusty rose, mushroom grey are the easiest 'looks expensive' monochromes for a quiet desk.
Idea 05 / 12
Marble effect keys
Pour a thin white acrylic base. While wet, drag a fine grey marker through it in irregular curves. Once dry, add subtle gold veins. Premium look.
Idea 06 / 12
Geometric coral pattern
Cream base, hand-paint a repeating geometric shape (chevrons, half-circles, dots) in coral. Reads modern + bold without being chaotic.
Idea 07 / 12
Holographic shimmer
Iridescent metallic acrylic markers. Layer pink → mint → gold → blue at slightly different angles per key. Looks alive under desk light.
Idea 08 / 12
Cherry-blossom canvas
Treat the whole keyboard as one canvas — paint a single illustration across the keys (cherry blossom branch, mountain range, your pet) and reassemble to align.
Idea 09 / 12
Pink ombré dawn-to-dusk
Soft blush at the top row, deepens to dusty rose by the bottom. Use 4 shades of pink + a damp brush to blend each row's seam.
Idea 10 / 12
Watercolor blue dots
Pre-wet keys with water, drop blue + lavender acrylic-marker washes, let bloom. Once dry, dot scattered white acrylic for highlights.
Idea 11 / 12
Black + gold luxury
Matte black base on every key, then a fine 0.5mm gold accent on each key's top-corner. Premium look in 30 minutes — the easiest 'expensive' finish.
Idea 12 / 12
Cottagecore florals
Cream base, scattered tiny wildflowers, fern leaves, butter-yellow accents. Each key a different little garden. The cosiest desk in the office.
Care + durability: making painted keys last
Sealed painted keys can survive years of daily use. Unsealed keys lose paint in weeks. The protocol:
Always seal. 2 light coats of clear acrylic spray, 30 minutes apart. Skip this and the spacebar wears within a month.
Re-seal annually. Heavy-use keys (spacebar, enter, E, A, S) wear faster. A quick re-seal every 12 months keeps them fresh.
Clean with isopropyl wipes. No solvents (acetone strips acrylic) or abrasive scrubs.
Touch up small chips immediately. A pin-sized chip becomes a quarter-sized peel within weeks if left.
Common mistakes (and how to avoid them)
Painting without removing keycaps. Paint pools at the seams + gums up switches. Always remove keys.
One thick coat. Acrylic cracks under typing pressure when applied thick. Always 2 thin coats.
Skipping primer on dark caps. White or light colours over black or grey keys go muddy. Apply a thin white acrylic base first.
Not sealing. Unsealed keys lose paint within weeks of typing. Seal every painted key.
Forgetting the alignment photo. Reassembling 87 keys from memory is a nightmare. Take a photo before pulling.
All-in-one Painting Set — Embrace creativity with 32 acrylic paints tubes (22ml), 10 Paint Brushes, 10 Art Canvas - [5x] 8x10 canvas board, [3x] 5x7 canvas, [2x] 4x4 small canvas, Palette, Knife, Sponge, 1x Wooden Easel
32 Artist Grade Paints — 32 premium paints for canvas painting that deliver vivid and vibrant pigment. Acrylic Ink tubes in this paint supplies set come in separate boxes for neat storage of art paints.
Acrylic Paint Set with Easel — This artist paint kits for adults comes with a multi-purpose paint easel that is light-weight, easy to use and makes it easier to paint various surfaces
10 Variety Canvas Panels — These paint canvases for painting are 100% Cotton, prepped and primed with 8 oz. of acid-free titanium gesso. Made of durable MDF to prevent your work from bending or warping
💰 Use code CHK10OFF at checkout · save 10% on this order
"I'm an adult artist and finger paint with these on canvas. Smooth body, good coverage, zero skin irritation. The colour spread is perfect."
— Jenna L. · ★★★★★
What painters say about Chalkola
4.7★
Average rating
12K+
Verified reviews
96%
Would recommend
Plastic-safe
Bonds permanently to PBT + ABS
★★★★★
"Painted my whole mechanical keyboard pastel-rainbow with the 1mm tip — 4 hours total, looks unreal. Sealed with clear coat, six months of daily typing later, zero wear."
Maya R. · Verified Amazon buyer
★★★★★
"Did the cherry-blossom whole-keyboard canvas as a gift — took 2 sessions. Reassembled with no smudges. Recipient cried (good cried)."
Jenna L. · Verified Amazon buyer
★★★★★
"The 0.5mm tip on these is the secret for keycap edge-detail. Other paint markers blob out at small scales. These stay crisp through hundreds of dots."
Olivia T. · Verified Amazon buyer
★★★★★
"Bought specifically for keyboard mods. Permanent on PBT and ABS, doesn't gum up under typing pressure. The metallic gold reads like real gold leaf."
Water-based acrylic paint markers (1-3mm tip) are the safest and most flexible — they bond permanently to PBT and ABS keycap plastic, dry in 30 minutes, and work for both fills and detail. Avoid solvent-based or spray paint for daily-driver keyboards (they pool, gunk switches, and need ventilation).
Water-based acrylic paint pens — non-toxic, quick-drying, and sealable. Avoid solvent-based or oil paints; they can damage plastic over time. Test on a single spare keycap first. Never paint while keycaps are installed — paint clog will destroy key switches.
Yes — acrylic paint pens adhere to ABS and PBT plastic keycaps after a quick wipe with rubbing alcohol for prep. Apply 2–3 thin coats rather than one thick one so the paint doesn't clog key stems. Let fully cure before reinstalling.
Water-based acrylic with the AP non-toxic seal — bonds permanently to PBT and ABS plastic, the two most common keycap materials. Apply on clean (isopropyl-wiped) keycaps in 2 thin coats. Always finish with a clear acrylic spray sealer — this is what makes the paint survive daily typing pressure.
Yes — always. Painting without removing keycaps causes paint to pool at the keycap seams, runs under, and gums up the mechanical switches. Removal takes 5 minutes with a wire keycap puller and prevents 90% of project failures.
Yes, if you remove the keycaps first, clean each cap, and paint only the tops and sides. Use acrylic paint pens in thin coats so keys still press smoothly. Let each coat cure 30+ minutes. Seal with matte clear spray for daily-use durability.
Pull all keycaps, sketch your design lightly in pencil treating the layout as a single canvas, paint with 1mm acrylic markers in 2 thin coats, add details with 0.5mm tip, seal with clear acrylic spray, and reassemble carefully aligning the design. Most full-illustration keyboards take 4-6 hours.
Lay all keycaps flat in their layout (use a sheet of foam-board with key-shaped cutouts to keep them aligned). Sketch the picture across the entire layout in pencil, then paint each keycap as part of the larger picture. After sealing + reassembly, the picture appears whole.
Wet acrylic: wipe immediately with a damp cloth or isopropyl wipe. Dried acrylic: scratch off with a fingernail or soft plastic tool, re-clean with isopropyl, repaint. For deeply soaked-in mistakes, light sandpaper (400-grit) followed by a primer base coat fully resets the keycap.
Paint between the letters rather than over them to preserve legibility, or paint over and re-letter with a fine paint pen in a contrasting colour. Keycaps with backlit legends (Corsair, Logitech) should not be painted over the transparent portion — the backlight won't glow through.
Sealed correctly, yes. A matte acrylic sealer spray (2 light coats, 20 min apart) locks the paint against finger oils and wear. Unsealed paint will fade in 1–3 months on heavy-use keys. Enthusiast keyboard mods use the same technique and last years.
Removing keycaps: 20 min. Cleaning: 20 min. Painting (2–3 coats + dry time): 2–3 hours. Sealing: 20 min + cure. Total: half a day for a full keyboard, or 30 min for accent keys only.
subscribe to receive special offers and new art ideas