New snacks on sale now for a limited time! Use code NEW for 15% off.
Chalk Markers · Technique Guide
Stippling Paint Technique with Chalk Markers
Updated Sep 2026
Stipple art is the dot-by-dot drawing technique that builds shading from thousands of single dots placed close together. This guide covers the stippling technique with chalk markers — six beginner-to-advanced stipple-art projects you can finish this weekend, the universal 5-step recipe, and how stippling fits alongside the other classical shading methods (blending, hatching, and scumbling).
The stippling technique is an art method that creates images, texture, and shading using small dots instead of continuous lines or brushstrokes. Whether you're working with chalk markers, acrylic paint pens, traditional paint, or colored pencils, stippling transforms individual dots into recognizable artwork through careful placement and density. This versatile technique works on any scale — from intricate miniature illustrations to bold large-format designs on chalkboards, canvas, and paper.
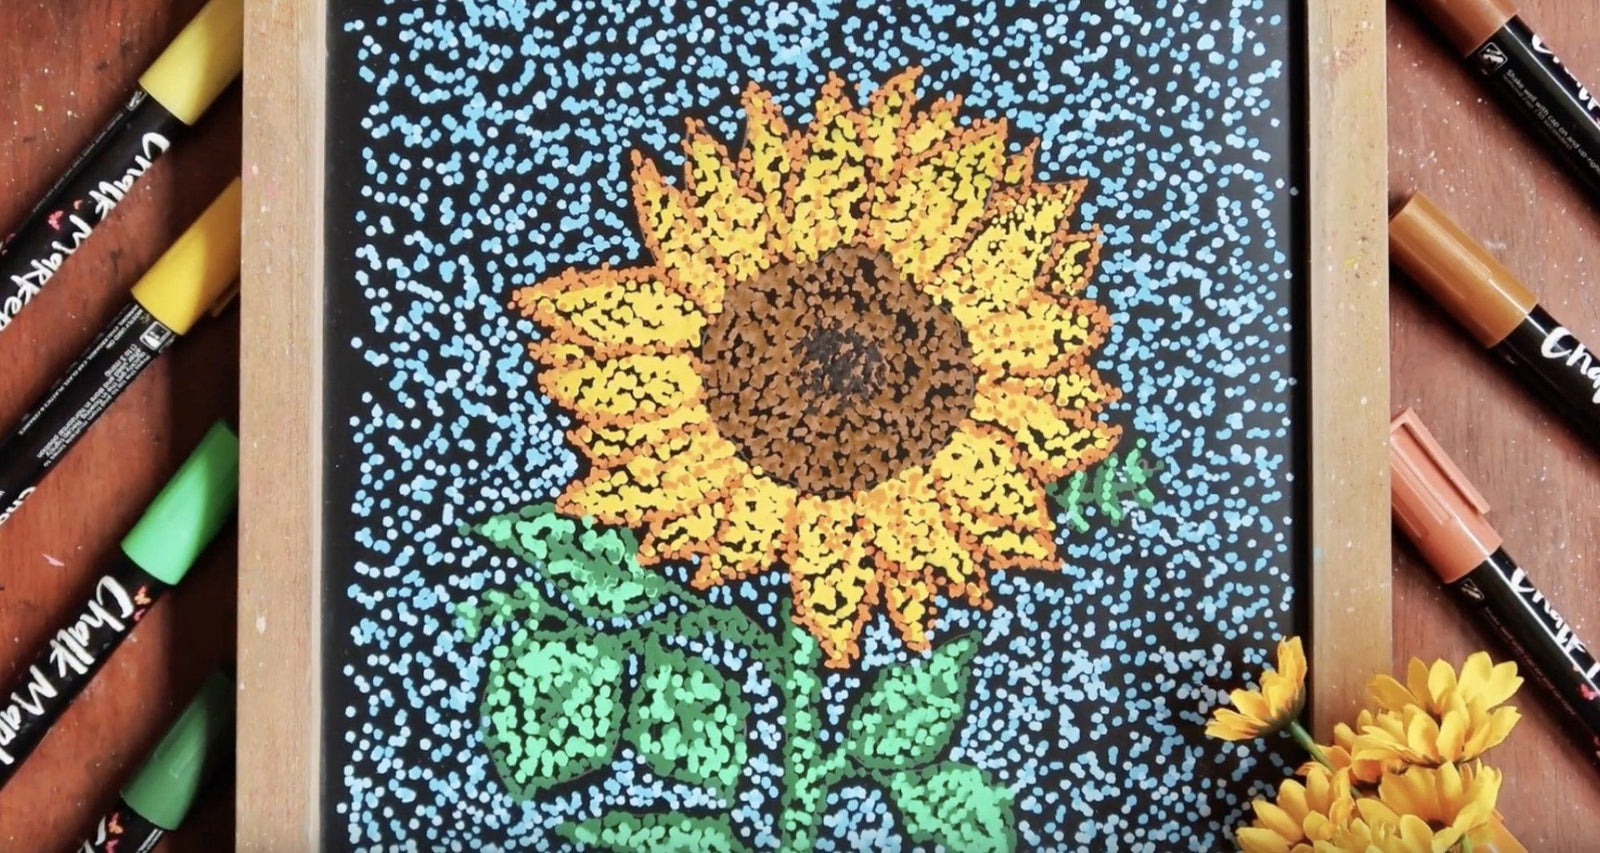
In this stippling art tutorial, we'll show you how to create a vibrant sunflower using chalk markers on a chalkboard. Perfect for beginners, this project demonstrates core stippling principles like dot spacing, color layering, and building dimension — skills you can apply to any subject or medium.
The 4 Chalkola chalk markers built for stippling
Stippling lives or dies on dot consistency. Fine tips for shading and edges, jumbo nibs for large dot fills — pick the kit that matches the piece you're making.
Before we get on to this fun art tutorial, let's break down what stippling means. In the simplest explanation, stippling is a technique that involves drawing, painting, or etching dots onto a surface using your art medium of choice. It can be chalk markers, acrylic paint pens, paint, or even colored pencils. This method is meant to create a recognizable image formed by the group of dots you have painted or drawn, whether it be on a small surface or a large one.
Now that we've defined what the stippling technique is, let's create a vibrant sunflower art out of dots!
Dot, dot, and create we go! Watch the helpful art tutorial below:
Steps:
Using a pencil, draw a faint outline of your design on the chalkboard.
Pick up the brown chalk marker and begin stippling at the center of the sunflower.
Tip: choose the darkest area of your design as a starting point for stippling.
Use the orange chalk marker and stipple the outline of each petal.
Stipple the inner part of the petals with yellow chalk marker. Just keep stippling until you get the look you want.
Use the dark green chalk marker for the outer part of the stem and leaves, and use light green for the inner part.
Paint the background with your color of choice, and add details to make the artwork as brilliant as can be!
It may look like a lot of work but it's definitely fun and simple to do! If you loved stippling a sunflower, check out this other awesome tutorial on How to Draw a Sunflower Using Chalk Markers. Happy creating!
What is stippling? A definition and a short history
Stippling is a mark-making technique where artists apply numerous small dots to create the illusion of tone, texture, and form. The term comes from the Dutch word "stippelen," meaning "to spot" or "to dot." Unlike blending or hatching, stippling achieves variation in value purely through the density and distribution of dots — closer dots create darker areas, while sparse dots produce lighter tones.
This art technique has roots in Renaissance engraving and etching, where artisans used stippling to create tonal gradations in printmaking. Today, stippling appears across multiple disciplines: pen-and-ink illustration, pointillism painting (though technically distinct), tattoo art, and modern graphic design. The technique's meditative, repetitive nature appeals to both fine artists and hobbyists looking for relaxing creative projects.
Stippling works with virtually any medium that produces distinct marks — technical pens, markers, paint daubed with brushes, or even digital styluses. Chalk markers have become especially popular for stippling on non-porous surfaces because they're erasable, come in vibrant colors, and maintain consistent tip pressure for uniform dot sizes.
Stipple art, in one paragraph: Stippling is the drawing technique of building tone, shadow, and texture from many small dots placed close together. It's one of four classical shading techniques in art — alongside blending, hatching, and scumbling. Stipple art can be done with ink, pencil, paint, or liquid chalk markers; the dots, not the lines, do all the work.
Stippling vs the 4 shading techniques in art
Stippling is one of the four classical shading techniques every art student learns. Each builds tone differently — the right one depends on the subject, the medium, and the surface you're working on.
Blending — smooth gradients with no visible marks, achieved by smudging or soft brushwork. Best for: portraits, soft skin tones, foggy backgrounds.
Hatching — parallel lines (or cross-hatched grids) that build value through line density. Best for: pen-and-ink illustration, architectural sketching, comic art.
Stippling — dots only. Density and spacing build tone without any line work at all. Best for: chalk-marker signage, tattoo realism, fine-line botanical illustration.
Stippling is the slowest of the four but the most controllable — every dot is a deliberate decision, so the final piece reads cleanly even on close inspection. It's also the easiest technique to master with chalk markers, because a chalk marker's spring-valve nib produces a consistent dot every time you tap straight down.
Stipple art vs stippling drawing — which one are you doing?
The terms get used interchangeably online, but there is a useful distinction. Stipple art usually means a finished piece intended to be displayed — a dotted sign, gallery-ready ink illustration, framed mandala, café chalkboard, or wedding-welcome easel. The medium tends to be ink, paint, or chalk marker on a non-paper surface. Stippling drawing usually means a graphite or pen study on paper — often a foundational exercise for art students learning value control, or a sketchbook practice piece.
Both share the same dot-density principles. The six chalk-marker projects on this page are stipple art — finished pieces meant to be hung, displayed, or used commercially. If you're stippling on paper with a fineliner pen, the same five-step recipe below still applies; you'll just be lifting your dots from a 0.05mm tip instead of a 3mm chalk-marker nib.
Stipple art history
Famous stipple art techniques (and where to see them)
Stippling sits at the centre of three different art traditions. Each one uses dots a little differently — recognising which tradition your piece belongs to helps you pick the right tools and reference.
Tradition 01 / 3 · 1880s painting movement
Pointillism — Seurat, Signac
AdvancedMedium · oil paint dabs
Georges Seurat's "A Sunday Afternoon on the Island of La Grande Jatte" (1884–1886) is the most famous pointillist work. Pure-colour dots placed side-by-side optically mix in the viewer's eye. Pointillism is a sub-set of stippling — all pointillism is stippling, but most stippling is not pointillism.
Where to see it: The Art Institute of Chicago (Seurat) and the Musée d'Orsay, Paris (Signac).
Tradition 02 / 3 · Pen-and-ink illustration
Tonal stippling in ink
MediumMedium · technical pen 0.05–0.5mm
Scientific botanical illustration, encyclopaedia entries, and editorial newspaper portraits use pure-black ink stippling on paper to build photorealistic tone. The Wall Street Journal's hedcut portraits are a modern descendant. The same dot-density rules apply — just at a microscopic scale.
Where to see it: any natural-history field guide or 19th-century scientific illustration archive.
Tradition 03 / 3 · Modern signage + tattoos
Decorative + tattoo stippling
EasyEasy · 3–6mm chalk markers
The newest stipple-art tradition. Café chalkboards, wedding signs, dot-mandala wall art, and modern tattoo realism (especially shading on portrait pieces) all use the same density-builds-tone rules — just on different surfaces. This is the tradition the six chalk-marker projects on this page belong to.
Where to see it: Pinterest "stippled chalkboard" boards, Instagram #stippletattoo, and any specialty café with a hand-lettered menu.
How to get a stipple effect with paint (vs chalk markers)
If you want a stippled effect with traditional paint, use a stiff dry-bristle brush (a stencil brush or worn-out flat is perfect) and a dry-dabbing motion: dip the bristles in paint, blot most of it off on a paper towel, then tap the brush straight down on the surface to deposit a cluster of dots in one go. Keep the bristles vertical and tap quickly — dragging will smudge the dots into hatching. Sponges, cotton swabs, and dot-painter daubers work the same way and are popular shortcuts on canvas and wood.
Chalk markers are the modern shortcut: a single tap of the spring-valve nib lays down a uniform dot every time, no brush priming, no paint mixing, no learning curve. That's why the six projects on this page all use chalk markers — you get the painterly stipple effect with a fraction of the technique work.
How to stipple, step-by-step
The sunflower tutorial above is the fastest path to your first stippled piece. The five steps below are the universal recipe — once you've internalised them, you can apply stippling to any subject, on any surface, with any chalk marker tip size.
Choose your nib size
Match nib size to subject. Fine tips (1mm or 3mm) for portraits, fur, and small mandalas. Standard 6mm bullet tips for medium-scale signage and bold florals. Jumbo 15mm nibs for window-art statement pieces. Mixing two or three sizes in one piece creates realistic depth — jumbo for the darkest masses, 6mm for mid-tones, 3mm for highlights and edges.
Plan your composition
Lightly sketch the outline of your design with a pencil before you put down a single dot. The pencil mark gives your dots a path to follow without showing in the final piece. Mark the darkest shadows and brightest highlights now — you'll use this map to control density later.
Start with light dots
Begin with sparse, evenly-spaced dots in the lightest areas. Hold the marker perpendicular to the surface and tap straight down — do not drag. Light pressure, small dots, even rhythm. The goal at this stage is presence, not darkness.
Build density gradually
Layer more dots into the shadow areas, packing them closer together until the tone matches your reference. It is much easier to add dots than to remove them, so creep up on darkness one pass at a time. Step back every 5–10 minutes to check overall value — stippling reads completely differently from across the room than from 6 inches away.
Add highlights & contrast
Once your shadows are right, switch to a fine 1–3mm nib and stipple in your brightest highlights with a lighter colour or white. The smaller dots in the brightest areas create optical sparkle. Finish with a few dark accent dots in the deepest shadows to push contrast and make the piece pop.
Pro tip: hold a paper towel in your non-dominant hand. Every 30 dots, dab the marker tip on the paper towel to clear dried pigment build-up. This keeps every dot sharp instead of progressively fuzzy.
6 chalk-marker projects to try this weekend
6 beginner stippling projects with chalk markers
Every project below uses Chalkola liquid chalk markers on a non-porous surface (chalkboard, glass, or sealed wood) so it wipes off cleanly when you want to redo it. Pick one that matches the marker tip you have on hand.
Project 01 / 6 · Café menu sign
Stippled menu-board border
EasyBest marker · 6mm reversible white
A daily-special chalkboard with a fully-stippled flower border — daisies and leaves built entirely from dots. The most useful first project because you re-use the menu every week and only redo the centre.
Pro tip: the border stays untouched between menu changes — only the centre text needs wiping. Use a damp cloth on the centre, leave the dotted border for months.
Project 02 / 6 · Welcome easel sign
Stippled welcome easel
EasyBest marker · 6mm reversible white
A standalone sandwich-board easel with the word WELCOME stippled inside thick block letters and a small dotted laurel-wreath border. Great for cafés, weddings, and pop-up shops.
Pro tip: outline the W-E-L-C-O-M-E shapes in white first with a thin stroke, then dot-fill inside. The outline keeps the letter form crisp even when you stipple loosely.
Project 03 / 6 · Holiday window art
Stippled snowflake window
EasyBest marker · 15mm jumbo + 6mm fine
Three or four stippled snowflakes scattered across a kitchen window with tiny dotted stars in between. Glass is the friendliest non-porous surface there is — takes chalk-marker pigment beautifully and erases with a single damp wipe.
Pro tip: work the design from the OUTSIDE of the window for best visibility from the street — or from inside if you want it to read for the family.
Project 04 / 6 · Pantry labels
Stippled mason-jar pantry labels
EasyBest marker · 3mm fine + 1mm extra-fine
Glass mason jars labelled SUGAR, FLOUR, COFFEE, etc. with stippled-fill block letters and a small dotted floral underneath. Wipe and re-label whenever you reorganise the pantry.
Pro tip: chalk markers can be drawn directly on the glass for permanent-feeling labels, or onto a paper tag tied with twine for a swappable look (shown).
Project 05 / 6 · Wall art mandala
Framed chalkboard mandala
MediumBest marker · 3mm fine + 1mm extra-fine
A radial mandala built entirely from concentric rings of white chalk-marker dots on a framed sealed chalkboard. Permanent-look wall art that you can erase and redesign whenever you want a new look.
Pro tip: pencil a light cross + 8 radii on the chalkboard before you start. Working in 8 symmetrical sectors keeps dot spacing even.
Project 06 / 6 · Botanical accent
Stippled botanical leaf accent
EasyBest marker · 3mm fine
A single botanical leaf rendered in white chalk-marker dots on a small chalkboard accent piece. Stippled veins darkest along the centre, fading outward toward the edge highlights. The fastest stippling project to finish in one sitting.
Pro tip: stipple the central vein darkest, fade outward in 3 density bands — full density, half, sparse. Leave the highlight side almost dot-free for the realistic 3D pop.
5 common mistakes
5 common stippling mistakes — and how to fix each
Most stippling failures show up in the first 100 dots. Plan around these five and the rest of the piece will fall into place.
01
Pressing too hard
Symptom: dots come out as splayed splotches with halos around them.
Do this instead: tap, don't press. Hold the marker perpendicular and let the nib's own weight make the dot. If you can hear the click of the spring valve, you're pressing too hard.
02
Skipping the test surface
Symptom: the first 30 dots on your real piece are too wet, too dry, or the wrong colour saturation.
Do this instead: always prime + test on a scrap of the same surface first. Shake the marker, prime the nib on paper, lay 10 test dots, then start the actual piece.
03
Inconsistent dot spacing
Symptom: tone reads as patchy — dense pockets of darkness next to light gaps.
Do this instead: work in tiny patches, not long sweeps. Fill a thumbnail-sized patch fully, step back, then move on. Random walking across the whole piece always produces uneven density.
04
Wrong nib for the design
Symptom: details look chunky on a small piece, or the fill is unfinished on a large piece.
Do this instead: match nib to scale. Fine 1–3mm for portraits and small detail, 6mm for medium signage, 15mm jumbo for window art. A single piece often needs two nib sizes — jumbo for masses, fine for edges.
05
Stopping too early
Symptom: the piece looks empty and amateur compared to your reference.
Do this instead: stippling needs more dots than you think. Fill density until shadows feel almost too dark, then walk away for an hour. When you come back, you'll usually find it's still slightly under-stippled. Trust the process.
What stippling artists say about Chalkola chalk markers
Real reviews from sign-makers, café owners, calligraphers, and home crafters who use Chalkola for stippled chalkboards, glass art, and signage.
4.7★
Average rating
24K+
Verified reviews
96%
Would recommend
1–15mm
Nib sizes covered
★★★★★
"Stippled my entire wedding-welcome board with the 6mm reversible — fine side for the inner detail, chisel side for the outline. The dotted laurel border took about 2 hours and looked exactly like the cafe-style boards I'd seen online."
Hannah R. · Verified Amazon buyer
★★★★★
"I use the fine 3mm 4-pack for stippled mandala wall art on a sealed framed chalkboard. Dots stay sharp, ink doesn't bleed, and when I want to redo it I just wipe + relayout. Best craft purchase this year."
Aisha N. · Verified Amazon buyer
★★★★★
"Did the SUGAR / FLOUR / COFFEE pantry-jar project from this article in one Saturday afternoon. The extra-fine 1mm tip was a game-changer for the dotted floral underneath the lettering. Looks bakery-shop perfect."
Olivia G. · Verified Amazon buyer
★★★★★
"The 20-pack 6mm reversible is my go-to for café menu boards. We change the menu weekly but the dotted flower border has stayed for 6 months — only the centre text gets erased and redrawn. Saves me an hour per Friday."
Stippling is a drawing or painting technique that uses dots instead of lines or solid strokes to build shape, shadow, and texture. Denser clusters of dots create darker areas; sparser dots create lighter areas. The technique dates to 15th-century engravings and is still used in illustration today.
Fine tips (1mm or 3mm) work best for detail stippling; standard 6mm tips work for larger, bolder pieces. Mixing tip sizes in one piece creates realistic depth — 6mm for large dark masses, 3mm for mid-tones, 1mm for fine details and edges.
Yes — liquid chalk markers stipple beautifully on non-porous chalkboards, glass, mirrors, and glazed ceramic. The dots stay crisp and don't bleed. Stippling on porous chalkboards works but the dots may feather slightly, which can be a desired effect for soft textures.
Small stippled pieces (4×4 inches) take 30–45 minutes. Medium (8×10) take 1.5–2 hours. Larger detailed pieces can take 4–8 hours. Stippling is patient work — the finished piece's depth comes from thousands of tiny dots.
Portraits, animal fur, night skies, botanical silhouettes, abstract mandalas, and textured lettering all excel with stippling. Subjects with strong tonal range — dark shadows and bright highlights — show off the technique better than flat even-tone subjects.
Yes. Fresh chalk-marker dots can be wiped with a damp cotton swab before drying. Dried dots come off with chalkboard cleaner spray on non-porous boards. On porous surfaces, rubbing alcohol on a soft cloth lifts most marks.
The stippling technique creates texture, depth, and shading in artwork without blending. Artists use stippling for illustrations, fine art, printmaking, and decorative projects on surfaces like chalkboards, canvas, paper, and wood. The method works especially well for organic subjects like flowers, portraits, and nature scenes.
They overlap but are not the same. Pointillism is a 19th-century painting movement that uses dots of pure colour placed side-by-side so the eye optically mixes them at viewing distance. Stippling is the broader technique of building any image — mono or colour — out of dots. All pointillism is stippling, but most stippling is not pointillism.
Yes, stippling is beginner-friendly because it requires only basic dot-making skills with any art medium. Start with simple subjects like the sunflower project on this page. Chalk markers work particularly well for beginners since they're easy to control, erase on non-porous surfaces, and produce consistent dot sizes.
Create shading by varying dot density and spacing. Place dots closer together in shadowed areas to create darker tones, and spread them farther apart in highlighted areas for lighter values. You can also layer different coloured dots or vary dot size to achieve gradient effects and dimensional depth.
The best markers for stippling have a firm nib, consistent ink flow, and opaque pigment. Liquid chalk markers (like Chalkola Fine Tip 3mm or Bistro 6mm) are ideal for non-porous surfaces because dots stay crisp and erase cleanly. Acrylic paint markers offer permanent stippling on canvas, wood, and metal. Avoid soft-tip felt markers — the tip flares as you press, and your dots become inconsistent within 50 dots.
The four classical shading techniques in art are blending, hatching, stippling, and scumbling. Blending creates smooth gradients with no visible marks; hatching uses parallel lines to build tone; stippling builds tone from dots only; and scumbling uses overlapping circular scribbles for fast textural shading. Stippling is the slowest and most controllable of the four — ideal for chalk-marker signage, fine-line illustration, and tattoo realism.
The terms overlap, but stipple art usually refers to a finished display piece — a chalkboard sign, framed mandala, dotted ink illustration, or wedding-welcome easel made with marker, paint, or technical pen. Stippling drawing usually refers to graphite or fineliner studies on paper, often used as foundational practice for art students learning value control. Both share identical dot-density principles; only the medium and intent differ.
Yes — the traditional method uses a stiff dry-bristle brush dipped in paint and tapped straight down on the surface, depositing a cluster of dots per tap. Sponges, cotton swabs, and dot-painter daubers work the same way. Chalk markers are simply the modern shortcut: a spring-valve nib lays down a uniform dot every tap, with no brush priming or paint mixing — so you reach the painterly stipple effect with a fraction of the technique work.